Digital Forensics: The Art of Uncovering the Truth After an Attack#
“In cybersecurity, the attack is loud but the evidence whispers. Digital forensics is the discipline of learning to listen.”
Introduction#
When a security incident happens a ransomware outbreak, a data breach, an insider threat the first questions that follow are always the same: What happened? How did they get in? What did they touch? What did they take?
These are not questions that network logs alone can answer. They require a systematic, disciplined process of evidence collection, preservation, and analysis. That process is Digital Forensics.
Digital Forensics is the application of scientific methods to the identification, collection, examination, and analysis of data in a way that preserves the integrity of the evidence and maintains a strict chain of custody so that findings hold up not just in an incident report, but in a courtroom if needed.
In the blue team world, digital forensics is one of your most powerful tools. It gives you the ability to reconstruct an attacker’s every move, long after they’ve tried to cover their tracks.
The Forensic Process:#
A forensic investigation isn’t just “look at logs and find bad stuff.” It follows a rigorous, repeatable methodology. While frameworks may vary slightly across organizations and standards bodies (like NIST SP 800-86), the core phases remain consistent:
1. Identification#
Before you collect anything, you need to identify what you’re working with. This means determining the scope of the incident, identifying all potentially relevant systems, devices, and data sources (endpoints, servers, cloud instances, mobile devices, network logs), and understanding which data is most volatile and must be captured first.
Volatility matters enormously. Data exists on a spectrum from CPU registers and RAM (gone the moment you power off) to hard drive artifacts that persist for months or years.
2. Preservation (Collection)#
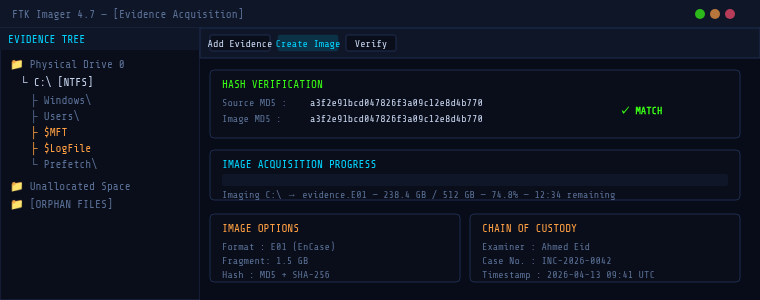
This is the most critical phase. The golden rule of digital forensics is: never work on original evidence. Every action taken on a live system can alter or destroy evidence. Your job is to preserve a forensically sound copy.
- Disk imaging creating a bit-for-bit copy of a drive using tools like
dd, FTK Imager, or Magnet ACQUIRE - Memory acquisition capturing a live RAM dump before powering off (WinPmem, Magnet RAM Capture, LiME for Linux)
- Hashing computing MD5/SHA-256 hashes of acquired images to prove they haven’t been tampered with
- Chain of custody documentation a formal, signed record of who collected what, when, and how
3. Examination#
With a forensically sound copy in hand, you begin the technical examination carving deleted files from unallocated disk space, parsing MAC timestamps, recovering registry hives, extracting browser history, and parsing log files. The goal is to surface raw data. Interpretation comes next.
4. Analysis#
Analysis transforms raw data into a meaningful timeline and narrative. This phase often involves correlating artifacts across multiple sources a Prefetch file timestamp on a workstation matched against a login event in your SIEM, matched against a firewall log showing outbound data transfer.
5. Reporting#
Your findings are only as valuable as how clearly they’re communicated. A forensic report must be reproducible, clearly distinguish facts from inferences, and include all relevant artifacts with their hash values, timestamps, and sources.
Key Artifact Categories:#
Windows Artifacts#
| Artifact | Location | What It Tells You |
|---|---|---|
| Windows Event Logs | %SystemRoot%\System32\winevt\Logs\ | Logins, privilege use, service installs, process creation |
| Registry Hives | HKLM\, HKCU\, SAM, SYSTEM | Persistence mechanisms, USB history, installed software |
| Prefetch Files | C:\Windows\Prefetch\ | Evidence that a program was executed, even if deleted |
| ShellBags | Registry | Folder browsing history, even for deleted/network folders |
| LNK Files | %APPDATA%\Microsoft\Windows\Recent\ | Recently accessed files and their original paths |
| $MFT | Root of NTFS volume | Full file system history including deleted files |
| Amcache / Shimcache | Registry hives | Application execution history |
Linux Artifacts#
/var/log/auth logs, syslog, application logs- Bash history (
~/.bash_history) commands run per user /etc/cron.*scheduled tasks (persistence mechanism)/tmp/and/dev/shm/common attacker staging directories- Systemd journal logs (
journalctl)
Memory Artifacts#
RAM is a goldmine. Live memory contains running processes with full command-line arguments, active network connections, encryption keys not yet flushed to disk, injected code in legitimate processes, and credentials in cleartext within process memory.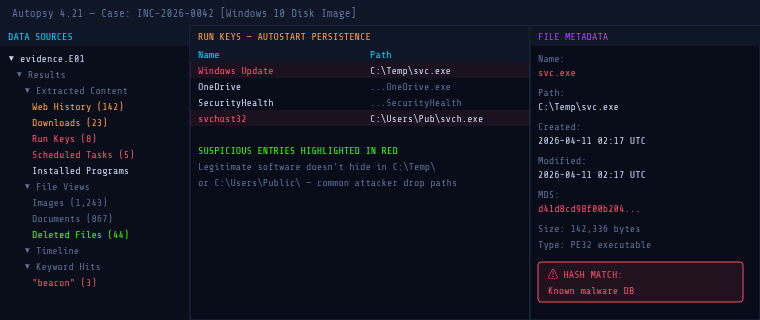
The Order of Volatility#
When you arrive at an incident, you must collect evidence in order of volatility most volatile first. This is codified in RFC 3227. A common mistake is to immediately reboot or power off a system. This destroys everything above “disk storage.” Always capture RAM first.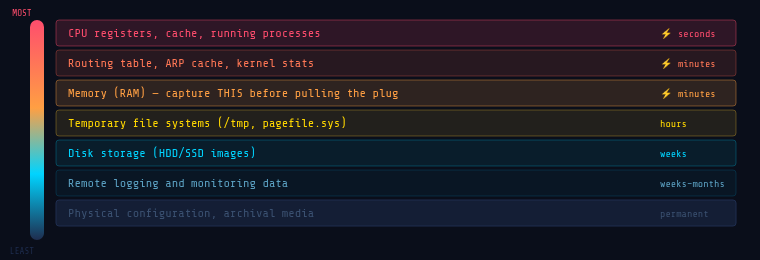
Essential Tools for Digital Forensics:#
Acquisition#
- FTK Imager (Windows) industry-standard disk imaging, free
- Magnet ACQUIRE full disk and memory acquisition
- dd / dcfldd (Linux) command-line disk imaging
- WinPmem / LiME memory acquisition for Windows and Linux
Analysis Platforms#
- Autopsy open-source GUI forensic platform, built on The Sleuth Kit
- Volatility 3 the standard for memory forensics
- KAPE rapid artifact collection and parsing by Kroll
- Eric Zimmerman’s Tools free, powerful Windows artifact parsers (MFTECmd, PECmd, AppCompatCacheParser…)
Log Analysis & Timeline#
- Plaso / log2timeline automated super-timeline generation from dozens of artifact types
- Timeline Explorer GUI frontend for analyzing CSV timelines (Eric Zimmerman)
- Kibana / Elastic Stack log ingestion and visualization for large-scale investigations
Memory Forensics with Volatility 3#
Memory forensics is where attackers try hardest to hide and where investigators often find the most damning evidence. Volatility 3 parses raw memory dumps using Python plugins, each targeting a specific artifact type.
# Get OS info from the memory image
python3 vol.py -f memory.raw windows.info

# List all running processes
python3 vol.py -f memory.raw windows.pslist

# Scan for HIDDEN processes (rootkit detection)
python3 vol.py -f memory.raw windows.psscan

# Show parent-child process tree
python3 vol.py -f memory.raw windows.pstree

# Active and recently closed network connections
python3 vol.py -f memory.raw windows.netstat

# Detect injected shellcode in processes
python3 vol.py -f memory.raw windows.malfind
The malfind plugin scans for memory regions marked PAGE_EXECUTE_READWRITE that aren’t backed by a file on disk a classic indicator of shellcode injection or process hollowing.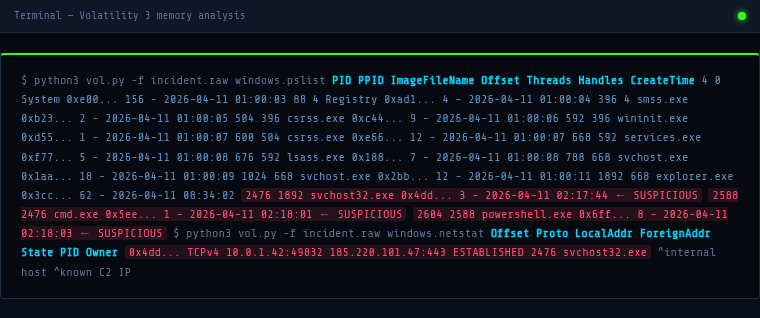
Digital Forensics vs. Incident Response#
Incident Response (IR) focuses on containment and recovery stop the bleeding, eject the attacker, get systems back online. Speed is paramount.
Digital Forensics focuses on evidence and understanding reconstruct exactly what happened, preserve proof, determine the full scope. Thoroughness is paramount.
In practice, they run in parallel. Your IR team contains the incident while forensic analysts image affected systems before they’re wiped. Failing to coordinate these two efforts is one of the most common mistakes organizations make critical evidence gets destroyed in the rush to restore services.
Putting It All Together: A Scenario#
You receive an alert: an endpoint is beaconing to a known C2 IP. Here’s how forensics fits into your response:
Legal Considerations#
If your investigation might result in criminal charges, civil litigation, or regulatory action, the legal dimension matters enormously. Chain of custody must be unbroken and documented from collection through presentation. Forensic soundness your acquisition methods must be defensible; any modification to the original evidence is disqualifying. Work closely with legal counsel before engaging law enforcement or making public disclosures.
Be aware of jurisdictional issues data stored in multiple countries may be subject to different legal frameworks (GDPR, for example, affects how you handle and report PII found during an investigation).
Conclusion#
Digital forensics is what separates a security team that merely responds to incidents from one that understands them. It’s the discipline that answers the hardest questions not just “what happened,” but “how,” “when,” “who,” and “what do we do to make sure it never happens the same way again?”
For blue teamers, building forensic skills isn’t optional. Whether you’re in a SOC, on a DFIR team, or a solo security practitioner, the ability to read what an attacker left behind is one of the most powerful capabilities you can develop.
In the next article, we’ll get hands-on with memory forensics using Volatility 3 walking through a real malware analysis scenario step by step.
Resources#
Official Standards & Frameworks#
- NIST SP 800-86 Guide to Integrating Forensic Techniques into Incident Response
- RFC 3227 Guidelines for Evidence Collection and Archiving
- SANS DFIR Posters & Cheat Sheets
Tools#
- Autopsy Digital Forensics
- Volatility 3 Memory Forensics Framework
- Eric Zimmerman’s Forensic Tools
- FTK Imager by Exterro
- KAPE by Kroll
Learning & Practice#
- SANS FOR508: Advanced IR, Threat Hunting & Digital Forensics
- Blue Team Labs Online Forensics Challenges
- CyberDefenders DFIR CTF Platform
- 13Cubed YouTube Channel Windows Forensics
Books#
- The Art of Memory Forensics Ligh, Case, Levy, Walters
- File System Forensic Analysis Brian Carrier
- Incident Response & Computer Forensics, 3rd Ed. Luttgens, Pepe, Mandia
Defensive Security Hub · Digital Forensics DFIR Blue Team